File Menu
File Menu - New
This command causes Clerk 2K to create a new data file in memory with no entries or setup data. If there is no current data file, a New (empty) data file will be created when Clerk 2K starts. The Save (or Save As) command can be used to save a data file created with the New command.File Menu - Open
This command brings up an Open File dialog from which a Clerk 2K data file can be selected. Once selected, that file becomes the current data file which Clerk 2K will use for subsequent processing.File Menu - Save
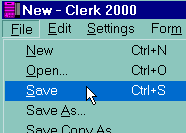 This command will save the current state of the open data file. If no data file has been selected yet,
this command will perform a Save As (see below).
This command will save the current state of the open data file. If no data file has been selected yet,
this command will perform a Save As (see below).File Menu - Save As
This command will bring up a Save As file dialog. The example shown below is for the Fancy Feet Cat Club show held June, 2000 and the file name used is 'FFCC Jun, 2000'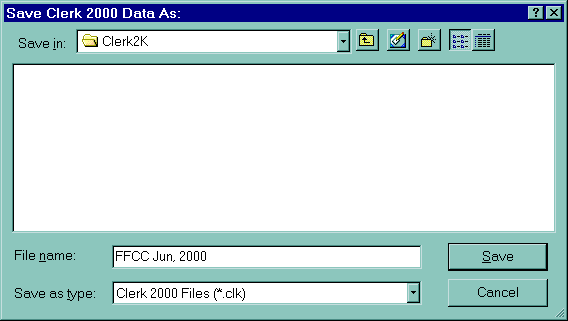
 You will notice, that after doing this the title bar of the main window changes to reflect the new file
name that you saved the data under. The title bar always shows the name of the current data file
being used by Clerk 2K. All subsequent Saves will be to this file.
You will notice, that after doing this the title bar of the main window changes to reflect the new file
name that you saved the data under. The title bar always shows the name of the current data file
being used by Clerk 2K. All subsequent Saves will be to this file.File Menu - Save Copy As
Similar to Save As described above, except that it does not change the name of the active data file. This command is useful when you want to save a backup copy of the current data file, but wish to continue processing the current file.File Menu - Email Data
This command is similar to Save Copy As, except that it will send the copy of the data file as an attachment to an email message.File Menu - Save CFA Data
This command causes a copy of the CFA data file required by show rule 16.06.1 to be copied to the disk in drive a:. This command also creates the data file (without any financial information) required by the Clerk 2K License Agreement to be created on both drive a: and the current working directory where the show data file is being stored. This file can either be mailed or emailed to fulfill the terms of the licensing agreement.File Menu - Print Setup
This command allows you to configure the printer for subsequent reports pringted by Clerk 2K.File Menu - Exit
This command exits Clerk 2K. If the data file in memory has been modified, but not saved, you will be asked if you want to save the data before exiting.File Menu - File List
This is a list of the most recently processed Clerk 2K data files. Selecting one of these entries has the same affect as Opening that file with the Open command.Edit Menu
Edit Menu - Undo
Undo is not currently supported by Clerk 2K.Edit Menu - Cut
Edit Menu - Copy
Edit Menu - Paste
Edit Menu - Auto Capitalize
If you have Auto Capitalize on (checked in the Edit Menu), Clerk 2K will automatically capitalize many of the text fields in the form. When using auto capitalize, text should be entered in lowercase. All uppercase characters will not be translated (will remain uppercase). If there is a character in the text that you are entering that you do not wish capitalized, preceed it with a grave accent character '`' which is just above the TAB key on most PC keyboards. NOTE: Some fields, such as the cat's name, are not affected by this option.Edit Menu - Lock Entries
Settings Menu
Settings Menu - Scaling
Settings Menu - Scaling
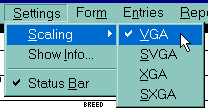 The size of the window (and the scaling of its contents) can be changed using the Scaling Item in the
Settings Menu. You should choose a setting to the size display used for your monitor.
Clerk 2K does no dynamic scaling of the window or support scrolling. So if you resize the window,
it will simply clip the Clerk 2K display or present you with extra blank space. To change the scaling,
you must select it from the Scaling menu item.
The size of the window (and the scaling of its contents) can be changed using the Scaling Item in the
Settings Menu. You should choose a setting to the size display used for your monitor.
Clerk 2K does no dynamic scaling of the window or support scrolling. So if you resize the window,
it will simply clip the Clerk 2K display or present you with extra blank space. To change the scaling,
you must select it from the Scaling menu item.Settings Menu - Show Info...
Settings Menu - Status Bar
Form Menu
- Clear Form
- Fees
- Medical
- Colors...
- Breeds...
- Region
- Class
- Double Cage
- Sales Cage
- Grooming Space
- End of Row
- Form Signed
- Send to Agent
Form Menu - Clear Form
This command clears the information currently on the form. If the form has been modified, you will be asked if you want to clear the form before it takes place.Form Menu - Fees
Form Menu - Medical
Form Menu - Colors...
Form Menu - Breeds...
This command is not normally used since in most cases the breed is selected by entering a Color Class number (either directly or indirectly from the registration number. If no color class number exists and the Breed is selected after selecting a Color (see above), then Clerk 2K attempts to look up the Color Class which matches the Breed and Color specified. If no match is found, Clerk 2K assumes that the entry is an AOV and uses the AOV color class number. In some cases, this may not be correct and the color class number will need to be looked up in the Show Rules manually.Form Menu - Region
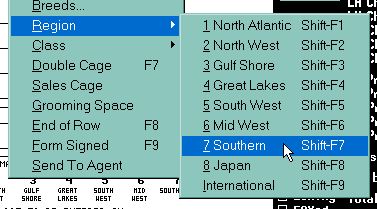 This sub-menu is used to select the owner's region of residence. It can also be selected by clicking on the
correct region on the form.
This sub-menu is used to select the owner's region of residence. It can also be selected by clicking on the
correct region on the form.Form Menu - Class
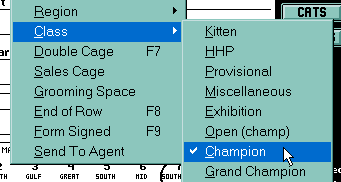 This sub-menu is used to select the Competitive Class. It can also be selected by clicking on the
correct class on the form. Note that selecting a kitten will add a K to the end of the class number and
selecting a Premiership class will add a P to the end of the color class number and change the sex from
male/female to neuter/spay.
This sub-menu is used to select the Competitive Class. It can also be selected by clicking on the
correct class on the form. Note that selecting a kitten will add a K to the end of the class number and
selecting a Premiership class will add a P to the end of the color class number and change the sex from
male/female to neuter/spay.Form Menu - Double Cage
Form Menu - Sales Cage
Form Menu - Grooming Space
Form Menu - End of Row
Form Menu - Form Signed
Form Menu - Send to Agent
Entries Menu
- Save Entry
- Confirm Entry
- Delete Entry
- Clear Confirmed
- Print Confirmed
- Email Confirmed
- Group Entries...
- Other Entries...
- Cats...
- Exhibitors...
- Owners...
- People...
Entries Menu - Save Entry
Entries Menu - Confirm Entry
Entries Menu - Delete Entry
Entries Menu - Clear Confirmed
Entries Menu - Print Confirmed
Entries Menu - Email Confirmed
It is possible to directly email a confirmation to an exhibitor. If the Email Confirmed command in the Entries menu (F11 command key) is selected, the entries will be sent to the email address of the exhibitor (same owner that is used to print a confirmation cover sheet). To do this, an email address must be entered for the exhibitor and you must be currently logged on to your ISP (most likely using Dial-Up Networking in the OS). Selecting this command will bring upa dialog in which you can type a short message which will be placed in front of the text of the confirmation that would normally be printed by the Print Confirmed command. In addition, you can send additional text at the end of the confirmation. This text is fixed and is read from the file "email.txt". You can create this text file using the Notepad editor. This file will usually contain a show announcement, hotel information and directions to the show. The Email Confirmed command does not clear or group the entries in the confirmation buffer. You must use the Group Entries command if you do not Print the entries after Emailing them.See Confirming Entries in the Entering Cats section.
Entries Menu - Group Entries...
Entries are grouped together when they are placed in the confirmation buffer and Printed or the Group Entries command is selected from the Entries menu. The reason for grouping entries is so that all entries from an exhibitor (even if the owners are not all the same) will be processed together.See Grouping Entries in the Entering Cats section.
Entries Menu - Other Entries...
Entries Menu - Cats...
Entries Menu - Exhibitors...
Entries Menu - Owners...
Entries Menu - People...
Reports Menu
- Address List
- Benching
- Benching Labels
- Catalog - Full
- Catalog - Master Clerk
- Checkin
- Exhibitor List
- Funds
- Judge's Book
- Summary
Reports Menu - Address List
This report is an exhibitor list with full addresses. This list is required by the show rules to be sent with the show package at the end of the show and to the regional director.Reports Menu - Benching
This report prints out groups of owners (and their cats) who last names match those of other owners, agents and benching requests. Although there may be people grouped together because they have the same last name as another owner. Barring typo errors by the EC, this list will contain all people who want to be benched together and as such, it makes benching MUCH easier than just a list of exhibitors with agent and benching requests (that report is available as well).Reports Menu - Benching Labels
Prints labels, one per entry, with Owner's name and Entry's information (catalog number, competitive class and entry's name). You should use either "Epson Compatible 9 pin" or "Epson Compatible 24 pin" printer driver (depending on what type of dot mattrix printer you have) and select it before printing. If you do not have this driver loaded, you can load it by using the Add printer command under Printers in Settings section of the Start Menu. After you select the Epson Compatible driver you MUST select Fanfold paper (from printer's Properties) and set the resolution (click on Properties for the printer and then the Graphics tab) to either 120x72 for 9-pin or 120x180 for 24 pin. Failure to properly set up the printer as described above will result in Labels that do not print correctlyThis Reports requires that you use 3 1/2" x 15/16" fanfold labels (12 labels per one 12" sheet) on your impact printer.
Reports Menu - Catalog - Full
Prints full catalog to be given to exhibitors.Click here to see a sample Catalog Page from an actual show.
Reports Menu - Catalog - Master Clerk
Prints abreviated catalog to be used by the Master Clerk.Reports Menu - Checkin
Prints labels with Exhibitor's name followed by catalog number, competitive class and name of each entry for that exhibitor. You should use either "Epson Compatible 9 pin" or "Epson Compatible 24 pin" printer driver (depending on what type of dot mattrix printer you have) and select it before printing. If you do not have this driver loaded, you can load it by using the Add printer command under Printers in Settings section of the Start Menu. After you select the Epson Compatible driver you MUST select Fanfold paper (from printer's Properties) and set the resolution (click on Properties for the printer and then the Graphics tab) to either 120x72 for 9-pin or 120x180 for 24 pin. Failure to properly set up the printer as described above will result in Labels that do not print correctlyThis Reports requires that you use 3 1/2" x 15/16" fanfold labels (12 labels per one 12" sheet) on your impact printer.
Reports Menu - Exhibitor List
Prints exhibitor list without full addresses. This is the exhibitor list normally included in the catalog.Reports Menu - Funds
Prints funding information for the show either by entry or by exhibitor.Reports Menu - Judge's Book
Prints the judges' book sheets for each judging ring. Set the judging ring from the Setup Dialog (in the Settings menu) before printing each ring. You should use either "Epson Compatible 9 pin" or "Epson Compatible 24 pin" (depending on what type of dot mattrix printer you have) printer driver and select it before printing. If you do not have this driver loaded, you can load it by using the Add printer command under Printers in Settings section of the Start Menu. After you select the Epson Compatible driver you MUST set the resolution (click on Properties for the printer and then the Graphics tab) to either 120x72 for 9-pin or 120x180 for 24 pin. Failure to properly set up the printer as described above will result in Judges' sheets that don't print correctlyClick here to see a sample Judge's Sheet from an actual show.
Reports Menu - Summary
Prints out a copy of the show summary as it will appear in the catalog. It also creates the file "summary.txt" which contains a text form of the summary report.Help Menu
Help Menu - Index
Help Menu - Using Help
Help Menu - Clerk 2K
Entry Form
- Name of Cat
- Registration Number
- Birthdate
- Sex
- Eye Color
- Color Class
- Breed
- Color Description
- Sire
- Dam
- Breeder
- Owner
- Agent
- Send Confirmation To
- Region
- Competitive Class
- Special Requests
- Benching Request
- Signature
Entry Form - Name of Cat
 Type in the cat's name in this field (KRYDDA HOT STUFF
in this example).
Don't include any titles (such as CH, PR, GRC, GRP, RW, NW). The name is automatically capitalized, so you
don't have to worry about that. It is also limited to 35 characters, which is the maximum allowable for any
cat. If the name provided is more than 35 characters, you will need to contact the owner to find out what
the problem is - again, CFA does allow more than 35 characters in any name.
Type in the cat's name in this field (KRYDDA HOT STUFF
in this example).
Don't include any titles (such as CH, PR, GRC, GRP, RW, NW). The name is automatically capitalized, so you
don't have to worry about that. It is also limited to 35 characters, which is the maximum allowable for any
cat. If the name provided is more than 35 characters, you will need to contact the owner to find out what
the problem is - again, CFA does allow more than 35 characters in any name.Entry Form - Registration Number
 When filling out the entry form, you should normally start with the registration number for the cat if there
is one. This is the field that has the focus when you start with a blank form. The reason for this is that
Clerk 2K extracts a fair amount of information from the registration number that makes entering the cat
much less work. First, it tries to find that registration number in its database of entries. If it is found,
the form is filled out with all the information from the database. In this case all you need to do is verify
that the information agrees with the entry form that you have, processs any special requests and enter the fees
for that entry.
 If the registration number is not in the database, Clerk 2K will be able to fill in the
breed, color class, sex and in most cases the color for the cat from the registration number. In some cases
the color is not known from the registration number because there is not a unique prefix for all colors of
that breed. In those cases you will need to specify the color (more on that later). If the cat is a HHP, you
can use 892 for the registration number for a neuter/male and 893 for a spay/female. If it is a kitten that
doesn't have a registration number, you can skip this field or you can type in the registration number
prefix with the letter K after it to have the have breed, color class, sex and color fields filled in. For
example, if the kitten is a red Abyssinian male, you could enter
0382K
(the leading zero is not required).
If the registration number is not in the database, Clerk 2K will be able to fill in the
breed, color class, sex and in most cases the color for the cat from the registration number. In some cases
the color is not known from the registration number because there is not a unique prefix for all colors of
that breed. In those cases you will need to specify the color (more on that later). If the cat is a HHP, you
can use 892 for the registration number for a neuter/male and 893 for a spay/female. If it is a kitten that
doesn't have a registration number, you can skip this field or you can type in the registration number
prefix with the letter K after it to have the have breed, color class, sex and color fields filled in. For
example, if the kitten is a red Abyssinian male, you could enter
0382K
(the leading zero is not required).Entry Form - Birthdate
 These 3 fields are the Birthdate for the cat. You enter the month, day and year. If you enter a 2 digit
number for either the Month or Day field, it will automatically advance to the next field (Month to Day, Day to
Year). Thus, it generally easier to if the month (or day) is 9, for example, to type
09 so that you don't have to TAB from one field to the next.
The date field will take either a 2 digit year code or the whole 4 digit year if you prefer to type that
in. After you enter the Birthdate, the age of the kitten/cat will be displayed in the status bar.
These 3 fields are the Birthdate for the cat. You enter the month, day and year. If you enter a 2 digit
number for either the Month or Day field, it will automatically advance to the next field (Month to Day, Day to
Year). Thus, it generally easier to if the month (or day) is 9, for example, to type
09 so that you don't have to TAB from one field to the next.
The date field will take either a 2 digit year code or the whole 4 digit year if you prefer to type that
in. After you enter the Birthdate, the age of the kitten/cat will be displayed in the status bar.Entry Form - Sex
Entry Form - Eye Color
Entry Form - Color Class
Entry Form - Breed
This command is not normally used since in most cases the breed is selected by entering a Color Class number (either directly or indirectly from the registration number. If no color class number exists and the Breed is selected after selecting a Color (see above), then Clerk 2K attempts to look up the Color Class which matches the Breed and Color specified. If no match is found, Clerk 2K assumes that the entry is an AOV and uses the AOV color class number. In some cases, this may not be correct and the color class number will need to be looked up in the Show Rules manually.Entry Form - Color Description
Entry Form - Sire
 Enter the name of the Sire (GC Krydda Rod Peppar in this example)
in this field. Note that the name was entered in all lower case. By default, Clerk 2K will capitalize
the Sire (and Dam) when you exit the field. You can turn this option off by selecting
Auto Capitalize in the Edit Menu.
 Thus, after TABbing from the Sire to the Dam field, the Sire is capitalized.
The Dam will also be capitalized when that field is exited. The
capitalization routines knows about most common abreviations for titles and will make them all upper case.
The recommend abreviations are CH GC PR GP GC,RW GC,NW GP,RW GP,NW.
Also, DM may be added to the end of of a cat with this title. Clerk 2K recognizes many more (such as
GRC and GRP), if in doubt try typing it in lower case and see if it
will change it to all upper case when you exit the field. Whatever abreviations you use, it is suggested that
you use them consistently for all entries (not just copy what the owner provided). This will make for a
consistent catalog when it is printed.
Thus, after TABbing from the Sire to the Dam field, the Sire is capitalized.
The Dam will also be capitalized when that field is exited. The
capitalization routines knows about most common abreviations for titles and will make them all upper case.
The recommend abreviations are CH GC PR GP GC,RW GC,NW GP,RW GP,NW.
Also, DM may be added to the end of of a cat with this title. Clerk 2K recognizes many more (such as
GRC and GRP), if in doubt try typing it in lower case and see if it
will change it to all upper case when you exit the field. Whatever abreviations you use, it is suggested that
you use them consistently for all entries (not just copy what the owner provided). This will make for a
consistent catalog when it is printed.Entry Form - Dam
Enter the name of the Dam (GC Krydda Pepparmint in this example) in this field. Processed the same as the Sire field described above.Entry Form - Breeder
Entry Form - Email
Entry Form - Owner
Entry Form - Agent
 This field (and the other Agent fields) are used to list an Agent. It
is important to enter the agent's name in the correct format (see Note
below) so that it can be matched with owners and benching requests for the benching report.
This field (and the other Agent fields) are used to list an Agent. It
is important to enter the agent's name in the correct format (see Note
below) so that it can be matched with owners and benching requests for the benching report.NOTE: It is very important to enter names in the correct format. If you do not enter them correctly, they will not be processed correctly for the Benching Report produced by Clerk 2K. As a general rule, you should seperate different last names (including first and middle names/initials) with a / (forward slash character) and not use that character any where else. Please see People and Names in the overview.
Entry Form - Send Confirmation To
 Use this field to select where the confirmation will be sent.
The Agent's complete address is needed if the AGENT box is checked (selected by clicking
on it with the mouse or by selecting the 'Send to Agent' item in the FORM menu) in the SEND
CONFIRMATION TO: field (just below the Agent information box).
Use this field to select where the confirmation will be sent.
The Agent's complete address is needed if the AGENT box is checked (selected by clicking
on it with the mouse or by selecting the 'Send to Agent' item in the FORM menu) in the SEND
CONFIRMATION TO: field (just below the Agent information box).Entry Form - Region
 If the correct region was not selected when the area code for the owner was entered, it can be manually
selected by clicking on the correct region on
the form or by selecting the region from the Region sub-menu in the Form menu.
If the correct region was not selected when the area code for the owner was entered, it can be manually
selected by clicking on the correct region on
the form or by selecting the region from the Region sub-menu in the Form menu.Entry Form - Competitive Class
 The Competitive Class can be selected by clicking the correct
class on the form with the mouse or by selecting the correct class from the Class sub-menu in the
Form menu. Note that selecting a kitten will add a K to the end of the class number and selecting a
Premiership class will add a P to the end of the color class number and change the sex from
male/female to neuter/spay.
The Competitive Class can be selected by clicking the correct
class on the form with the mouse or by selecting the correct class from the Class sub-menu in the
Form menu. Note that selecting a kitten will add a K to the end of the class number and selecting a
Premiership class will add a P to the end of the color class number and change the sex from
male/female to neuter/spay.Entry Form - Special Requests
 A request for a double cage, sales cage, grooming space or End of Row can be specified by clicking on the
appropriate item (it can also be selected from the Fees sub-menu in the Form menu). The associated fee
entered in the setup dialog will be automatically added to the Paid field (in anticipation that the
exhibitor has paid in full for their entries and requests).
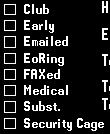 Additional requests can be selected from the list of items to the right of the form. The associated fee
entered in the setup dialog will be automatically added to the Paid field (in anticipation that the
exhibitor has paid in full for their entries and requests). The Club request is generally used in one of
two ways. The first is if the club gives a discount for club members (such as a fixed discount, the cost
of a double cage if they get free doubles, etc.). The second is to set the fee to zero and just use this
as an indicator that this entry is from a club member (most likely for benching purposes). The Early field
is for an Earlier Bird discount. This option will work best if there is a fixed discount for all entries.
If the discount is not the same for all entries, then this value should be set to the discount for the
first entry and the entry fee will have to be manually adjusted for aditional entries. The Emailed
item is used to indicate that this is an emailed entry and the email fee is added to the Paid field.
The EoRing (End of Ring Benching) has no fees associated with it, but is used to indicate that the
exhibitor has requested end of ring benching as per show rule 11.02. The FAXed item is used to indicate
that this is a FAXed entry and the FAX fee is added to the Paid field. The Medical item is used to
indicate that the exhibitor has a special medical request. This is simply a flag which gets added to the
benching information. Usually this is used in conjunction with an EOR request or a special request added
to the Note field. When an exhibitor is requesting a free EOR for medical reasons, it is easier to select
the EOR request before any other fees or requests, go to the Paid field and hit the ESC key to erase the
EOR fee and then select the other requests and entry type. This will save you from manually editing the
Paid field to remove the EOR charge. The Subst. request is used to indicate that this entry is a
substitution for another entry. It is recomended that when a substitution is being made that first the
cat that is being substituted for be brought up, its fees and entry type noted, and then delete that entry
(see Delete Entry item in the Entries menu). Then enter the substitution, select the same requests and entry
type for the substitution that had been entered for the cat being substituted and then select the Subst.
request to add in the substitution fee. It is generally a good idea to make an entry in the Note field
of the cat that this is a substitution for (such as subst. for Wrapper
). The Security Cage request should be selected if the exhibitor has indicated that they will be
providing their own security cage and are requesting space to set it up.
Additional requests can be selected from the list of items to the right of the form. The associated fee
entered in the setup dialog will be automatically added to the Paid field (in anticipation that the
exhibitor has paid in full for their entries and requests). The Club request is generally used in one of
two ways. The first is if the club gives a discount for club members (such as a fixed discount, the cost
of a double cage if they get free doubles, etc.). The second is to set the fee to zero and just use this
as an indicator that this entry is from a club member (most likely for benching purposes). The Early field
is for an Earlier Bird discount. This option will work best if there is a fixed discount for all entries.
If the discount is not the same for all entries, then this value should be set to the discount for the
first entry and the entry fee will have to be manually adjusted for aditional entries. The Emailed
item is used to indicate that this is an emailed entry and the email fee is added to the Paid field.
The EoRing (End of Ring Benching) has no fees associated with it, but is used to indicate that the
exhibitor has requested end of ring benching as per show rule 11.02. The FAXed item is used to indicate
that this is a FAXed entry and the FAX fee is added to the Paid field. The Medical item is used to
indicate that the exhibitor has a special medical request. This is simply a flag which gets added to the
benching information. Usually this is used in conjunction with an EOR request or a special request added
to the Note field. When an exhibitor is requesting a free EOR for medical reasons, it is easier to select
the EOR request before any other fees or requests, go to the Paid field and hit the ESC key to erase the
EOR fee and then select the other requests and entry type. This will save you from manually editing the
Paid field to remove the EOR charge. The Subst. request is used to indicate that this entry is a
substitution for another entry. It is recomended that when a substitution is being made that first the
cat that is being substituted for be brought up, its fees and entry type noted, and then delete that entry
(see Delete Entry item in the Entries menu). Then enter the substitution, select the same requests and entry
type for the substitution that had been entered for the cat being substituted and then select the Subst.
request to add in the substitution fee. It is generally a good idea to make an entry in the Note field
of the cat that this is a substitution for (such as subst. for Wrapper
). The Security Cage request should be selected if the exhibitor has indicated that they will be
providing their own security cage and are requesting space to set it up.Entry Form - Benching Request
 This field should be used to list benching requests for other
exhibitors (only names). If the exhibitor is requesting something of the form
"with other Birmans", that form of request should be placed
in the Note field described below. Names entered in this field should be in the correct
format (see Note below) so that they can be matched with owners and
agent requests for the benching report.
This field should be used to list benching requests for other
exhibitors (only names). If the exhibitor is requesting something of the form
"with other Birmans", that form of request should be placed
in the Note field described below. Names entered in this field should be in the correct
format (see Note below) so that they can be matched with owners and
agent requests for the benching report.NOTE: It is very important to enter names in the correct format. If you do not enter them correctly, they will not be processed correctly for the Benching Report produced by Clerk 2K. As a general rule, you should seperate different last names (including first and middle names/initials) with a / (forward slash character) and not use that character any where else. Please see People and Names in the overview.
Entry Form - Signature
 Clicking on this field will cause a small version
of the owner's name to be displayed (you can also check the Form Signed item in the Form menu or use the
F9 function key to toggle this setting). If you do not indicate that the form has been signed, you will be
prompted about it when the entry is saved.

